
K.I.S.S- Grab Your Napkins & Get Craftin'
One of my "signature features" on this blog is K.I.S.S which stands for Keep It Simple Soiree. It's the segment where I get to take a step back from the spa portion of parties and just present simple, usually D.I.Y ways to step up your party game and present guests with those little details that make your party stand out. A few posts back, I mentioned how impressed I was with some of the things that paper crafters manage to come up with. Anybody planning a party would do well to take a gander at Splitcoast Stampers website because these ladies can do wonders with a piece of cardstock/scrapbooking paper.
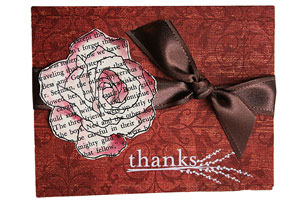
Today I came across another tutorial which is just perfect for the party planner novice or professional... Felted Cardstock. This technique uses plastic wrap to fuse a dinner napkin to a piece of plain cardstock. You can use your new cardstock for a variety of party projects including cupcake wrappers, toppers, confetti, gift boxes, signage, etc. Signs created with this technique would be great for labeling items on your buffet, drink area or candy/dessert bar, where the coordinating napkins are presented of course. In the tutorial she uses white cardstock, but a colored cardstock could also be used if the backside will also be visible. The image below is an example of how she used the technique to create the base for a thank you card, the card is durable but retains the texture of the napkin.
We always have the 12 7/8 in x 15 5/8 in guest towels available in our bathroom when hosting guests, which of course is a perfect tie-in if your having a spa party.
Check out the video tutorial or written tutorial created by Lydia Fiedler. Have fun trying this one yourself... signing off now to go a-hunting for some napkins around the house.
Update: I've actually gotten a chance to try this technique and it works pretty well. The initial step of separating the printed part of the napkin from the back it the most tedious part, and you do have to be careful not to tear the napkin. That being said, using a coordinating cardstock instead of white can help to mask those little tears that do occur. Here are my results... in the first photo I showed the full piece of coverd cardstock along with the cardstock I used for the backing and the original napkins. The second pic shows some cutouts I did to experiment, a square piece, a cupcake wrapper, and some circles that could be used for various things (the 2 in circles are perfect for cupcake toppers). These are napkins we had laying around that my mom picked out, I'd love to try the technique with more modern/hip napkins with stripes or geometric shapes rather than a floral print. Overall, it came out nice though, I was concerned that when I cut it for projects the 2 layers would begin to separate but that didn't happen. Next I may try making a box of some sort to see how it holds up to scoring and folding.

If you try this and post it on your blog be sure to leave me a link I'd love to see the results.
Happy Crafting :)


.jpg)


0 comments:
Post a Comment
Please Deposit Your 2 Cents!